Friday, 26 August 2011

A Multitude of Chook Bums - Diary of a Frustrated Photographer

Greetings all, welcome to my blog.

The other day I decided it was time to take some more stock photos.  They are the photos I am collecting and which one of these days I will put up for sale on the internet.  I also  use them to choose the subjects for my watercolour paintings, and I wanted to paint a chook.

That's the plan anyway - try and make some money when I'm old and decrepit (next year the rate I'm going!). Yes, I know its not a great plan but its all I've got for now, ho hum.  Anyway, full of optimistic fervor, I grabbed my little camera  and  went in hot pursuit of my two pet chooks, Henny and Penny.  I didn't have to pursue very far - they were, as usual, camped on my back door mat and peering inside hoping I would emerge bearing some yummy food.

There used to be three chooks for me to photograph, Henny, Penny and Jenny, but Jenny went to chookie heaven (and before you ask, no we didn't eat her - we paid a vet $150 to peacefully send her to chookie heaven as a matter of fact - and no, as far as I am aware, the vet did not have chicken dinner that night either).  Henny and Penny are two standard little red chooks to whom I am eternally grateful as they dedicatedly keep my back yard free of weeds and snails and earwigs and millipedes and just about any other thing that crawls about eating my plants, and they give me eggs (and fertilizer, mostly on the aforementioned back door mat).  Mind you, they are not delicate of step and anything that couldn't survive a good ol' chook foot stomping has gone by the wayside (evolution in action - only the tough, tall and strong survive).  Yes, the yard looks good  and I no longer need a machette to fight my way to the garage door,  nor do I worry about which deadly species of snake could be lurking, waiting to get me if I were to step forth into the garden. 

Sorry, I digress.  The first problem with photographing  our feathered friends is the height difference (unless you're photographing Emus).  They are generally a lot shorter than we are.  Now if you are still young and supple this is not a problem as you can put your graceful, slender and lithe body in any number of anatomically impossible acrobatic positions to achieve your goal.   If,  however, you are of my vintage with bits of your anatomy  that seem to have forgotten what it means to stretch or bend, photographing a chook can present a bit of a problem, but undaunted, I came up with a method to try. 

Firstly,  I waited forever for Henny and Penny to stop in one spot and then I tried kneeling down gently on one knee.  After the pain subsided and I had stopped gasping,  I quickly abandoned that idea.  Lying down on my belly,  flat against the nice soft concrete (splattered with chook poo) was equally unsuccessful (it was so easy when I was younger....).  Equally unsuccessful  were my desperate calls for help "Ron, Ron, Rooooonnnnnn - help me, heeelllllpppp - I can't get up,  HEEEEELP!!!!

Eventually I realized help would not arrive any time soon as my only hope of rescue was still inside,  dedicatedly connected to his electronic gadgetry by impenetrable ear phones and blissfully unaware of my predicament.   Looking a bit like a beached whale I rolled over on to my side and finally managed to haul my not insubstantial weight up off the ground.  Gasping as I sat down on a chair attempting to remove the chook poo,  the idea of photographing chooks was beginning to lose some of its appeal, but stubbornly I persevered.

I guess what followed next  was a sight to see and I must have looked a bit odd to anyone peering over the fence.  I refer to the  sight of me as I waddled crab like, head down and bum up around the back yard, with arms extended towards some chooks,  whilst I groaned and went red in the face.  It is not surprising that  they wonder about my sanity.

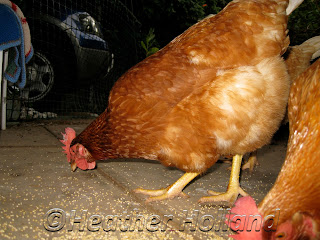
It was at this point  in the exercise (and I mean that literally)  that I found out I had a great expertise in photographing chook bums.   It is not that I had any intention of photographing a chook's bum, it is just that I found out that they have some secret inner sense that allows them to know just the moment  when the camera is going to take the picture.  When this previously undocumented sense is combined with their equally unrecognized ability to execute a perfect 180 degree turn within a nano second, the result is a beautifully photographed image of either one or two chook bums.  Through much study, I have found that they also have the skill to co-ordinate their movements and perform their turn around at exactly the same time.

Classic Chook Bum (side view)

 Now don't get me wrong, I am sure that chook bums can be of interest (to another chook for instance) but I was not putting myself through physical torture just to get chook bum photos.  Although I am now a bit of an expert on a chook's bum and the interesting things that can stick to it, what I really wanted was a chooks head, so I changed my tactics.  I went to the tub of budgie seed and lifted the lid.  Budgie seed, I have discovered, is Henny and Penny's favourite food in all the world.  Why this is I am not sure as they have their own delicious food (organic wheat, organic oats, yummy chookie layer pellets, chookie mixed grain), but what they really crave is the seed I feed to the budgies.  Maybe it is the chook equivalent of forbidden fruit, their secret little craving.  Maybe they are just jealous of the budgies, who knows?

Anyway, I had barely lifted the lid and they came running, looking hysterically funny as they did so.  Watching them run always cracks me up laughing - I just can't help myself as I watch them heading towards me, clucking excitedly (cupboard love).   They lift their feathery skirts to reveal their feathery pantaloons, stretch their wings out and go to mach 2, heads extended and bobbing from side to side as they run.  Before I had the lid completely off, they were there.  I sprinkled the seed on the ground, got the camera ready, put my own head down and bum up and got ready to take a prize winning photo.

It was at this point that I found out that they could still beat the camera.  They can put their heads down,  peck the seed and raise their heads again so fast that my camera was still only thinking about focusing.  I now have a nice collection of photos with beautifully focused chook bodies (and bums) with strange reddish blurs in the head region.  They all look like something out of a surrealistic art gallery (Dali would have loved them).


I am sure you have heard the term "running around like a headless chook".  Well, I know the real truth of where that saying originated.  Everyone thinks it refers to a chook with its head chopped off.  My theory is that it was coined by an extremely frustrated photographer who discovered that chooks have the ability to quickly move their heads forward just as the camera clicks and that no digital camera, no matter how expensive, will beat them.  Hmmm, lots of photographs of  well fed,  decapitated chooks.


Typical Decapitated Chook Photo
Secret Cravings


 By this time, the light had faded and the flappy, flighty,  fast footed,  feathery fowl were off down the bottom of the back yard (no doubt snickering).  They strolled slowly around and then sat down nice and still and I knew it was just  to taunt me.   I looked at them in frustration and they looked right back at me.  Have you ever really looked into a chooks eyes, the chooks you think are so cute?  When you look  into those eyes you can really see how they are descended from dinosaurs - a T-Rex would be hard put to better the evil gleam that was in their eyes as they watched me putting away my camera.

Look At Those Eyes - Wouldn't Want to be an Insect

 And when you do finally get a photo, you realize you have been so busy focusing on trying to get the chook's photo that you have completely failed to observe the background, so your lovely prize winning photo ends up with such decorative items as garden hoses, rubbish bins, old shoes, clothes lines, etc. (sigh....).


I'm Sure They Were Snickering


Next time I'm going to photograph the cat (she's too lazy to move).  


Where's that camera?


I'll give her a break and hold my head still, just this once mind you (and I bet she hasn't noticed the hose (chookie chuckle).

The T-Rex With Feathers

 Cheers from Heather, chook photographer extraordinaire (not!).


Sunday, 7 August 2011

Out And About Looking at Mosaics

This is just a quick little blog for anyone who is interested in mosaics.

Recently my brother Chris came to stay for a visit, so every second of my spare time was taken up in taking him to and fro to check out various parks and museums.  During our little jaunts we kept noticing mosaic artworks here and there, some of which I photographed.  Just thought I would share them with you as I thought they were very clever. 

The first one we came across was at  St Bedes Anglican church at Semaphore,  which is an old suburb of Adelaide  by the beach.   St Bedes is an old church which happens to be the church where my grandparents were married and I had not been there before, so it was interesting to look around the outside.  Apparently they have an art and craft market there once a month, so must check that out too. There was a large wall mosaic (sorry my photo did not turn out) and the one below was on the ground at one of the entrances to a church hall.

Mosaic at St Bedes Church Semaphore

The second one we came across was a mosaic seat in a little park called the Stockade Park, which is a charming little park tucked away in a suburb of Adelaide.   It was originally an old quarry and it has been turned into garden where lots of people get married.  This is a view of the whole mosaic seat and below it are some section views.


Park Bench at Stockade Botanic Park


The next day we went to an historical museum at Enfield (another suburb of Adelaide) which was surrounded by gardens in which we found another of these mosaic seats.

Park Bench in grounds of Enfield Historic Museum

While we were visiting Gawler, a city north of Adelaide we came across this rather arty toilet block done with square tiles.

Mosaic on a wall at Gawler, South Australia

Mosaic on a wall at Gawler, South Australia

 Finally, we ended up coming across another pretty toilet block at Morgan, which is a town on the River Murray.  My cousin Jim lives there an is an authority on the history of Morgan and the River Murray Paddle Steamers.   There are a lot of pelicans on the River Murray and a clever mosaic artist has depicted once here.  In  the pioneer days there were large numbers of paddle steamers which carried passengers and cargo up and down the river, stopping on their way at river ports like Morgan, so the second one depicts the steering wheel and flag from a river boat.  A number of these boats have been restored and are still on the river as tourist attractions.


Mosaic at Morgan, South Australia

Mosaic at Morgan, South Australia

And finally, I went to my friend Rosemary's and in her garden she had a mosaic bird bath, upon which I happened to place the lemons she was giving me.  I really liked the look of them on there so I took a photo and I am now doing a watercolour painting of the lemons resting on their mosaic base.  Hopefully I will finish it successfully!

Rosemary's Birdbath and Lemons


Well, that's my short blog on the mosaics we came across during one week in July.  I'm going to be on the lookout for more from now on as I really like them.  Cheers.

Saturday, 25 June 2011

Porcelain Pallettes and A Medley of Mixed Media Exhibition

Hi everyone, welcome to my blog.
I had an absolutely lovely day today.  I went with my cousin Dianna to the “Porcelain Palettes and a Medley of Mixed Media” exhibition at Gallery M in the Marion Cultural Centre.  


Overall view looking into Gallery M

I had never been to this  gallery before as it is over an hour’s drive from where I live, but it was well worth the effort, even if it seemed to take forever to get there through the traffic.  Gallery M is run by the Red House Group on behalf of the City of Marion.  According to the gallery website "The Red House Group Inc is an artist managed non-profit organisation that acts as a focus for art and cultural activities for all individuals and groups in the City of Marion council area and its surrounding region".


I was interested in going there as I knew that some of the artists whose work was being exhibited were also members of the Port Community Arts Centre, which is the art group of which I am a member.   Also, one artist in particular is a lovely lady who works in the framing shop opposite to where I work.  Her name is Betty Hermel and she does lovely porcelain pieces.  It was Betty who originally told me about it and urged me to attend.
Two of Betty Hermel's Works of Porcelain Art

The exhibition was presented by the members of  APAT (Australian Porcelain Art Teachers)  and a number of their talented artist friends, so there was lots to see (after we had had coffee and cake in the adjoining cafe of course - a perfect combination that - coffee shop and gallery - what more could a couple of girls want on a day out!). 
Cousin Dianna inside Gallery M
The gallery is modern, light and bright with pleasant music playing in the background.  There is also a permanent gift shop at the entrance with lots of high quality,  beautiful pieces of porcelain, pottery, glass, jewellery, paintings, etc. all for sale at a range of prices.  It is certainly a great place to shop if you are looking for a gift for someone special. 


Inside the gallery we were treated to a charming display of excellent porcelain art, both traditional and contemporary.  There was something to suit everyone’s taste.    I asked and was granted permission to take a few general photographs of the works on display.  There were also artistic offerings in oils, watercolours, pastels, fabric, glass and clay.  

Some of Di Mitchell's beautiful bird paintings
There were some lovely paintings hanging on the walls and as I roamed around some of Di Mitchell’s beautiful coloured parrots caught my eye.  She is a very talented porcelain and watercolour artist.  


Further along I caught sight of some of Colleen’s flower paintings and also some of her beautiful porcelain vases.  She always paints the most beautiful roses on her vases and in her watercolour paintings.  In this photo two of the tall vases on the right hand side are Colleen's, as is the yellow rose painting on the far left wall.
As you can see, there were some sculptural pieces the majority of which brilliantly portrayed animals, birds and reptiles.  

The beautiful Tawny Frogmouths

I particularly liked Roger Hjorleifson's Tawny Frogmouths which had been faithfully represented with their poses perfectly characteristic of these interesting native birds.  I really love Frogmouths – they sit completely still and are very hard to see against the bark of a tree.  They are so convinced that you can’t see them that you can be a foot away and they won’t move.  When I worked in the wildlife park they would stay really still, then open their mouth to take the food I offered and then freeze right back into the same position and act like they could not be seen again.   
Sorry, I digress, where was I?  Oh yes,  animals…. there was also a lovely display of painted glass panels designed to be set into a leadlight window.  They had gorgeous Splendid Blue Wrens on them (my Mum’s favourite bird) and they would have had great appeal to any bird lover.  

The Blue Wren panels
  
Well done APAT , thanks for giving us such an enjoyable exhibition. The exhibition is still open until 3rd July, so if you live in Adelaide why not pop along and check it out, especially if you are on the lookout to buy something gorgeous to compliment your home decor.  Gallery M is at Marion cultural Centre, 287 Diagonal Road, Oaklands Park right near Westfield Marion Shopping Centre www.gallerym.net.au

I will leave you with a few more photos from the exhibition.  Cheers.  
Another of Roger Hjorleifson's sculptures
A pair of Di's Parrots


Another of Betty's works


Wednesday, 22 June 2011

Umbrellas In Space

Hi everyone, welcome to my blog.

Yesterday,  at long last, I finally finished another in my umbrella series of paintings entitled "Umbrellas In Space".  Yep, those little umbrellas I've been doing have finally made it all the way to the final frontier - Spock would have been impressed - I hope he might have even found them "interesting" (Star Trek Forever - Yaaaayyyyy!!! - oops sorry about that couldn't help myself).  

"Umbrellas In Space"


This last painting took me ages to do and I had no end of trouble with it.  I am writing this blog for those of you like me, who are still  beginners at watercolour painting. 

After having previously (successfully, I might add) used Indigo in my balloon series painting "Gone Forever",  I again decided to use it in my blend of colours for the "Umbrellas In Space" background. 

"Gone Forever"

Indigo is such a lovely colour but it seems to get on to everything and absolutely refuses to come off!  It stained me, the table and my brushes blue.  Everything in the immediate vicinity seemed to be stained indigo, but undeterred I persevered and continued mixing paint for my test sheet. 

The sage advice from John Ford, my long suffering art teacher had finally sunk in and  I was being a good girl and planning my work, instead of doing my usual dive right in and  see what happens method (which is usually followed by the  "oh well, another one for file 13" action).  I never used to write down what colours I used because I remembered them from class to class.  Nowadays,  I find myself staring blankly at a painting I have started, frantically trying to remember what the heck I used and trying not to wonder what are the early signs of  alzheimers?

With this umbrella painting I built up the background with a number of layers of indigo blend washes (indigo with some cobalt blue and a touch of pthalo), trying to not be discouraged by the fact that my Neef brush (the one that cost me more than most of my other cheap and nasty brushes put together) was moulting so much I was convinced it had the mange.  A word of advice - don't try and pick off the shed hairs while the painting is still wet - another lesson learnt the hard way.....ho hummm  (yes John, I know you've told me that before on countless occasions - what can I say - I'm a slow learner, I have senior moments... senility?...I won't do it again I promise!)

I performed my usual appallingly streaky washes until John pointed out what I was doing wrong and away I went again on the road to perfection (ha ha!).  A word to the beginner - load your brush, load your brush, load your brush when you do a wash - make this your mantra.  Because I am poor at present (and I am sure I am not alone in this)  I tend to get a little bit ikey with the amount of paint I use.  I never put enough on the brush and never mix enough for the task.  Whether you are  doing a single wash or multiple washes, you need to be prepared to make up a lot of paint.  If you run out before you are finished it is sometimes difficult to remix another batch to exactly the same shade.  It is even harder if you didn't plan and keep note of what colours you mixed in the first place (see John, I am learning at last - your words have not been in vain!).

Anyway, after a few little traumas and multiple washes all eventually went OK and was looking great.  This lasted until I spilt a big blob of water on to what, only two seconds before,  had been my  perfect background.  Darn, darn, darn (or words to that effect) I lamented.  After I frantically soaked it up with a tissue I had a less than perfect background.  I had to wash the whole painting all over with more water to lift off the paint and make it all the same shade as where the dratted blob had landed, then dry it again and then re-apply a few more layers of wash.  Wash, dry, wash, dry, wash dry  - by the time I finished I felt I would still be wrestling with this piece when they came to cart me off to the retirement village and I was sure I had wasted 2/3rds of a tube of Indigo. 

I probably should have told you that before the indigo affair,  in order to do the stars  in the background   I applied whiteout (masking fluid) to the paper with a stiff brush (you can use a toothbrush) using the  well known classic  "look out everybody and stand back" method.  This method is the one where you load the brush, take aim, flick and fling for all you're worth and hope like heck the stuff lands where you want it to, so that your painting will look like a masterpeice and not a messterpeice.   I cleaned the table (again) freeing it of the flung off whiteout, a large percentage of which had gone everywhere  but where I wanted it to (of course - success is all in the wrist action I think).  I then carefully masked out  the umbrellas. 

For anyone new to watercolours, a little tip re your masking fluid or whiteout.  It doesn't come off clothing.  It will wreck your brush in no time flat - the horrid stuff will set like rubbery glue as it dries on the brush before your very eyes.  The way to avoid this happening is to put a little bit of soap or detergeant on the brush before you dip it in the whiteout.  Remember to repeatedly rinse the stuff off in water and then add your soap all the time while you are working, especially if it is hot weather (if you are in Adelaide in summer and its 40 degrees C, I have no suggestions to offer - perhaps climb into the fridge to work?).   

And now for another of those little hard learned lessons.  If you are aiming for a dark background and think you might be going to do multiple washes wherein you will be dragging your moulting brush repeatedly over the whited out surface,  then put on of LOTS of whiteout and make sure there are no bubbles in it.  In this painting I must have applied my masking fluid  a little too thinly and had a couple of bubbles to boot (which later  burst).  When I removed it,  there were countless little spots where the indigo had leaked through onto the paper below, so instead of nice white umbrellas they looked like they had contracted the bluebonic plague - little indigo dots everywhere (I was sooooo not impressed!).  A large portion of the time I spent on this painting was actually taken up by trying to remove this blue acne, and like acne it proved to be stubborn to eradicate (any other blue would have been easy, but I HAD to use indigo didn't I!). 

Indigo is a really, really strong colour - it's like the Arnold Schwartznegger of colours (sorry Arnie, probably spelt that wrong)!  I ran towards John in full hysterical lament bemoaning my misfortune (he saw me coming but couldn't escape in time).  I had spent so very long doing the background I was not going to scrap the darn thing without a fight.  After John calmed me from being hysterial to just plain grumpy,  he advised me to firstly try to wet the offending areas and try and lift the paint off with a tissue.  If that didn't work then to gently wet and rub at it with a brush and soak up the lifted paint with the tissue  (BUT DON'T , WHATEVER YOU DO,  RUB TOO HARD AND DAMAGE THE SIZEING!!!!).  The sizing (not sure if I've spelt that right either ) is the stuff on the surface of the paper and if you rub too hard and damage it, when you go to paint over it,  it will give you a nasty uneven finish because the paint will soak into the paper differently where the sizing is damaged or gone.  You really, really don't want to do this, you know..... so, anyway, after I had naturally managed to damage the sizing on the first one I attempted (ho hum, sigh),  I continued in a much more delicate fashion.  Happily, some but not all of the indigo lifted, leaving  fainter blue dots.  

To cut a long story short I then spent what seemed like forever trying to hide them.  Firstly I tried white watercolour  but Indigo Arnie just brushed that away and seeped right through tough and strong as ever.   Eventually, I resorted to putting some tiny dots of white acrylic over them and then painting over the top of the white areas with gouache, until the white bits were actually white again (at last yaayyy!).  For any beginners who don't know it, gouache is a water based paint which is more opaque that watercolours. In hindsight, it would probably have been quicker to re-paint the whole thing but I couldn't  jolly well afford to go and buy another tube of indigo!  

The stars in the background also proved an annoyance.  Before the whiteout and  indigo wash were applied I painted the paper with some lightly coloured washes of yellow and pink, the idea being that the splattered whiteout would go over this, then the indigo washes and when it was all removed my little stars would be faintly coloured.    As it turned out, my under washes were not strong enough in colour, the whiteout lifted off what little color there was so that when it was removed the stars just looked white.  I then had to go over it and carefully place some light colour into lots of little stars. 

This too  proved to be a time consuming exercise which had to be done with an almost dry brush.  If it was too wet it ran into the indigo and made a light blue star with a lighter indigo halo around it.  I always intended to put some planets in this picture, however there are now couple more planets than I originally intended,  one of which resulted from this little "colour in the stars" exercise.  The other planet was instantly bought into creation when I (again!!) dripped a drop of water onto the indigo background.  It was quickly soaked up with a tissue and painted over to make the planet.   A word from the newly wise - keep you water bowl well away from your painting!!  Also keep your coffee cup on a different side to where your water is (surely I am not the only one who has dipped their brush into their coffee by mistake?).  

So, although it all turned out alright in the end, "Umbrellas In Space" was an interesting,  time consuming exercise in what not to do, and also how to fix what are technically termed  "stuff ups".  

My thanks, yet again,  to John my ever patient teacher  for his advice (which he knows I am repeatedly brilliant at ignoring).  I think my little love affair with Indigo Arnie has finished for the moment and my next umbrellas will have a nice, light, transparent background (I wish).   Though I've got to admit,  I like the pretty light blue colour of my once white taklon brushes..... now if I could just get the indigo out from under my fingernails......skin....t-shirt......(sigh.....).....


Cheers all and have a creative day.

PS - If you like "Umbrellas In Space" and would like to buy it please go to my Artfire Studio at http://www.artfire.com/modules.php?name=Shop&op=listing&product_id=3464113

Tuesday, 21 June 2011

Not Happy - For Port Community Art Society Members Only


If you are not a member of the Port Art Society this blog will not be of interest to you.  
I am an amateur artist and this is an email I sent to the Committee re their proposed new changes - if you are a member who will be effected by this decision and you happen to agree with any of this and don't want a society where the petty jealousies of a few vocal and disgruntled members (who have not been voted as winners in art exhibitions) can effect other happy members like myself, please let the committee know your thoughts (if you don't agree, then feel free to comment).  If anyone is upset with the content of this, sorry, but I am really annoyed about the pettiness of the whole thing and we can't all expect to be winners.

"I just wanted to say how unhappy and unimpressed I am about Committee’s decision to remove prizes in all but one of the art shows next year.  This decision is one which I confess I just do not comprehend and which I think is a backward step for the society and its members.  As I understand it, certain members who do not like competing with the more professional artists have lobbied the committee to take this action, which I think is so important it should have been put the the members to vote on.  Whatever their reasons they are entitled to their opinion, but as a member I too am entitled to mine and to have it heard, so here it is -   like it or not. 
I remember how unimpressive our past exhibitions were, both in the number and quality of the exhibits (and I include my own earlier works in that description).   I can see for myself just how much better our exhibitions are now that we have a larger number of exhibitors both  amateur and  “professional”. 
I feel that we are so very lucky to have talented artists of a high standard who are interested enough to become members of the society and take part in the members exhibitions.   I also consider that having professional artists is a drawcard for those exhibitions – the higher the standard the more the visitors who come to the gallery exhibitions and attend the openings.  This, hopefully then translates into more support from sponsors, government, council and also into sales for us all. 
Professional artists need to make a living at their art, so prizes and recognition are important to them as they are part of the means by which they earn their daily bread and butter.  Amateur artists should be realistic and not begrudge them this (and if another professionals does, he/she is not being very professional in their attitude to competition and is more likely being motivated by professional jealousy than anything else).  It does not mean that we cannot still compete with them and one day aim to be counted amongst their ranks.

It is my opinion that the best way to get both the professional and serious amateur artists exhibiting work of a consistently high standard is to offer incentives such as prizes and awards.

I gather a few of the membership are upset that prizes often  (but not always) go to some of our really talented professional members and I am guessing that they must have felt they were missing out on getting a prize because of that.   I assume they would like to return to the past and have the professionals fade away so that they can be the big fish in a small pond, rather than being brave enough to venture out into the big ocean of art competition as just a small fish. (Perhaps we should have a special beginner’s section and prize for those who feel unsure about competing – they could be allowed to exhibit in it say, 5 times, before its time for them to start swimming with the bigger fish?) 
Most of  those “professional” artists who now win prizes, started out as small fish and had to compete with the big fish to get where they are now.

Sorry if I sound a bit disgruntled and bitter or sarcastic, but the Committee has now completely denied any of the fish, big or small, the chance to win any sort of prize or recognition at all, and what’s the point of that, especially if you are trying to make a living from your art  or if you are  just seeking to supplement your art expenses with some art material prizes???!   

I am only an amateur artist (mediocre at best) but I place my art in art shows all over Adelaide as often as I can afford to do so.  One of the things that drives me to do this, apart from the desire to sell a painting, is the thought that I might just win a prize or merit award.    I have received two merit awards at Port members’ exhibitions and I have absolutely no objection to competing with either the professionals or the other talented non-professionals  in our membership, many of whom attend the same art classes as myself.

At any art show I enter,  I accept the fact that I will be competing with the professionals, but the thought of winning a prize has always made me try that little bit harder and pay extra attention to the presentation of my work.  What better thing  than to get an award in a competition where you know you were competing with some of the best eh?!.   Indeed, I feel honoured to have my work hanging in an exhibition amongst those talented people and I don’t begrudge them the top prizes – they have usually worked hard for it. 
Ever the optimist, I have my art for sale on the internet on Artfire and I am a member of an Artfire seller’s guild called “A Passion for Painting on Artfire”.  To be in the guild you have to be an exhibiting member of Artfire.  Some guild members are really impressive artists and some are amateurs like me, but each month we have a friendly monthly challenge where we all try and beat each other to  win that challenge.  In this competition there is no real monetary prize, the prize is the recognition of being the winner for that month, but it brings out the best in us and challenges people like me to try and to give the professionals a bit of a run for their money.
That is how our art exhibitions should be, friendly competitions with as many of the best prizes  as we can get and no sour grapes from any of us if we are not successful in being considered the best of the bunch by independent judges .   We all benefit by having our work hanging along side well known artists. 
One of the reasons I don’t feel threatened or jealous of other prize winners is because of the excellent tuition I have received from my art teacher. He has done everything in his power to help his students to become the best they can be and always endeavours to provide them with the help and tips that make them better able to present their art confidently (and win those merit prizes which we now won’t have!). 

I don’t think I lose out on sales because I don’t get a first prize or if my painting is hanging next to a first prize winner (at least if I’m hanging there I have more chance of being noticed!). There are buyers for all price ranges and whilst someone may admire the first prize winner’s efforts, they may not like the price tag that is attached to it.  However, if they see and like one of my paintings with a much better price, then I might make a sale when the pro artist doesn’t.  Besides, in the interest of the society’s coffers it is good to attract a buyer with big money who is looking to buy prizewinning art and we should do everything we can to get them in the door.  It is better for the society that they buy a nice expensive painting done by one of those talented professional members as the society gets commission from the sale and let’s face it, we’ll get a much better sales commission from it than from one of mine! 

Lastly, let me just bore you a little longer and tell you the tale of a country art group in  SA  of which I was a member,   and of the studio they ran.  It was a small society with a council owned studio with lots of space but not much happening.   It had been stagnating for years and badly run by a small group of artists who didn’t like new members or competition.  A couple of them thought they were the best artists in the town and let the other members know it.  A little while before I joined, a new committee  was elected (which included my brother who had recently moved there and a small group of enthusiastic people) and they set about putting it on the map because they all wanted to sell more of their art.
They started to promote it and invited members to try and put more art on display, they encouraged people from outlying areas as well as inviting professional artists to exhibit.  This upset a few of the long standing members who didn’t want any competition, but they persevered and organised prizes and art competitions and the word spread.  Articles were written up in the local paper and more and more people started coming to the gallery.  Their membership increased for the first time in years and years, they had more volunteers and were open longer hours and as a result both the visiting exhibitors and the members started getting more sales.   They painted the gallery and did some eye-catching coloured panels.  In short, they did all they could to put their society and its artworks  into the public eye.  They even started getting requests from interstate artists asking to exhibit and they hosted a special exhibition from the SA Art Gallery.   People from the prestigious gallery just up the road started visiting their gallery to check it out.  They handled all the art with white gloves and taught their members how to hang the art to best advantage.  They got a computer and put members and artists on their mailing list. 
Sadly, my brother and his wife had to stop participating when my mum became terminally ill, and shortly thereafter,  ill health prevented a few more of the committee from contributing their help for a period of time.  Enough of the “old guard” were re-elected to the committee and everything went downhill from there.  They actively discouraged the professional artists, didn’t continue with the competitions, knocked back requests for members of the society to exhibit their art in neighbouring art society galleries and stopped hosting exhibitions.  The art on show went back to being small in quantity and poor in quality  and items were left on show for long periods without being rotated with something fresh.  They didn’t even let their members know when they were invited to exhibit  elsewhere.  They also knocked back the council’s offer to install air conditioning for the studio along with some other improvements.  The membership fell away and as a result they couldn’t get enough volunteers anymore to man it every day of the week, so they only opened for 1 or 2 days only.  No professionals exhibited there anymore, very few members of the public came in. Sales completely fell away, and to cut a long story short, the council decided they were no longer worth supporting and when the decision was made by council to upgrade and rebuild certain buildings in the area, they were no longer offered a studio.  This is all true and rather sad, but it shows what can happen when people harbour petty jealousies and resist positive competition and change. There is now no more place for any of them to sell their art.  The only people really hurt by it all in the end were the amateur artists – the professionals still exhibit in the other gallery just up the road.   
I think the society should consider very carefully any actions that might deter professional artists from exhibiting.  I think that the society should encourage students and amateur artists to exhibit and offer them lots of merit awards and prizes.  Don’t take away our prizes please!
Well, that is my 2 cents worth (hmmmmmm, actually it’s probably more $2 worth, but what the heck). " 


ps 23/6/11:  There is presently a rule that paintings or works of art can only be exhibited once in member exhibitions.  With this in mind I think the committee should consider the possibility that the standards of the exhibitions will further be decreased because some members like myself  will choose to hold back their best works from the other exhibitions because we will prefer to enter them into  the only competition where the prizes are still being awarded.   


Sunday, 19 June 2011

Scratchboarding Workshop with Patrick Hedges 18/6/2011

Hi everyone

I just got back from doing an interesting 2 hour Scratchboarding Workshop with my best friend Rosemary (pictured below intensely studying the contents of our goodie bag).  The tutorial was with local scratchboard artist Patrick Hedges and the workshop was hosted by Port Art Supplies in the heart of Port Adelaide  ( sales@portartsupplies.com.au ).  They provided us with a nice warm  environment away from the biting cold and we were presented with a goodie bag of interesting and mystifying scratchboarding tools and a small black scratchboard upon which to create.  

Standard Cutting Tools - Pointed (great for fine lines)  and Curved (good for scraping back big areas)
Wicked Looking Cutter and Assorted Blades each of which produced lots of different effects.

Line Tool (which made lovely neat lines) ,  The Fibreglass Tool and Wire Brush Tool
Oil Free Steel Wool


The Black Scratchboard just waiting for us to scratch, scratch, scratch

Anyway, what, I hear you ask, is scratchboarding?  What is this gal on about?  I didn't know either, so to fill you in, a scratchboard is a board you work on to scratch out a brilliant work of art (if you are Patrick Hedges).  It is apparently an old art form that children often did at school (must have been before my time!).

Scratchboards  are either white or black and the techniques and results do differ according to which type you are using.  

Rosemary With Goodie Bag Contents

The black scratchboard is a board which has been coated in a layer of white stuff (technical term - clay I think) and then coated on the top with a layer of indian ink - basically it looks and feels like a blackboard.  The picture is created by delicately scratching away at the black top layer to reveal the white clay beneath.   Each tool creates different types of scratch marks on the board.  A prepared sketch can be traced onto the scratchboard using special tracing paper.  

The design is then painstakingly and delicately scratched out.  The deeper you scratch, the more white it will be.  Layers of watercolour can also be added to the exposed white areas to add colour and these areas can then be scratched away as well to achieve degrees of colour and shading.  The finished work is then given about 3-4 coats of a spray on varnish. Conveniently, the varnish dissolves any greasy finger marks away and removes any traces of carbon paper etc (cool, so much easier to keep clean than watercolour painting). 


A  scratchboard showing some scratching techniques (no I didn't do it - too good for me - this was one of Patricks samples for us to look at)
Layers can be scratched away and areas can be shaded with diluted indian ink and then rescratched again, until you have achieved perfection (which means you can also fix your stuff ups and whoopsies (more technical terms). 

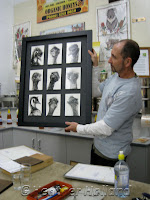
The old man on the sample board above was (I think but am not sure) created using Patrick's "squiggly" technique, if it wasn't that it was the wire brush.  Anyway, below are some photos of Patrick and some of his  scratchboard art done on the black type of board. 
Each one of these superb emus was done on a black board and the black was removed to reveal an exquisite emu.  The white background was mostly scratched away with  steel wool.  The fibreglass brush was extensively used to create them and each one took about 6 hours to complete.  Patrick uses a number of different scratching techniques in his artwork to get the desired effects.  
The Himba (hope I got that right?) Lady from Africa was done entirely with a scratch knife using a technique called feathering, where a lot of parallel lines are used in rows and then more rows are put in about 15 degrees in a different direction (apparently the feathering technique with a sharp knife or cutter is the best to use to do young soft skin).  Washes of diluted indian ink were also used and then the board was re-scratched until she was perfect.  She took him about 60 hours to complete.  
Patrick with his Himba Lady From Africa


Old ManWith Hat


As I mentioned earlier, watercolours or inks can be washed over a scratched board.  Below is a lion's eye which took Patrick about 10 hours to complete - it has been delicately coloured and I think it is amazing!  The coloured chicken used watercolours over the scratched board, and oil paint was used for the background. 

Lion's Eye

Patrick With His Chicken


The other type of scratchboard is a white one.  This is used to create art with a textured finish.  It is coloured with watercolours or inks and then scratched back to create a carved looking surface - this can be done over and over until some amazing results are achieved, as per the orangutan below:


Orangutan scratched on to White Scratchboard
And what did I do you ask?  Well, being me I wanted to test out what each tool did and this was the result:


Heather's Scratchboarding Efforts -da daahhh!


After having done the workshop I've got to admit I am in awe of Patrick's abilities and I think I could get addicted to scratchboarding.  I have bought a couple of little boards to play with and I'll see what I can do.  If anyone wants to check out more of Patricks art here's his website: www.patrickhedges.com

Well, that's it for this blog - hope you found this little introduction to scratchboarding interesting.  If you want to try it yourself, Port Art Supplies has everything you need (83 Commercial Road Port Adelaide South Australia  08 8241 0059) and they take credit card (thank goodness).

Cheers all.


Patrick endeavouring to convert us to scratchboarding.

Rosemary hard at work

Everyone getting right into the swing of things